
Skip to content

Audio React Toolkit for Cinema 4D

Cinema 4D plugin that animates anything in your scene to music

Works in
You need
Cinema 4D 2023.2 to 2027 (exact versions below), on Windows 10 or 11 (64-bit).
Includes
Drag-and-drop connections · Probes on the spectrum · Bakes to keyframes

Working in Unreal Engine? See ARTK Audio Reactive Toolkit for Unreal Engine 5, a separate plugin.

On Instagram

Audio-reactive pieces

Short pieces from our Instagram, shown here without their music. Follow a link to watch one with sound.

Demos

Some examples

Each video shows a scene in Cinema 4D being connected to a song in the Audio React Toolkit panel. Play them with the sound on.

  • Office scene on liquid drum and bass

    A rigid body simulation driven by the drums: the kick lifts the floor, the snare throws everything into the air.

  • Face rig on deep house

    A face rig and five deformers on a deep house track. Eleven parameters, four probes.

  • Diamond scene on a lo-fi beat

    Camera, materials and a cloner following a lo-fi beat.

Overview

Music-driven animation in Cinema 4D

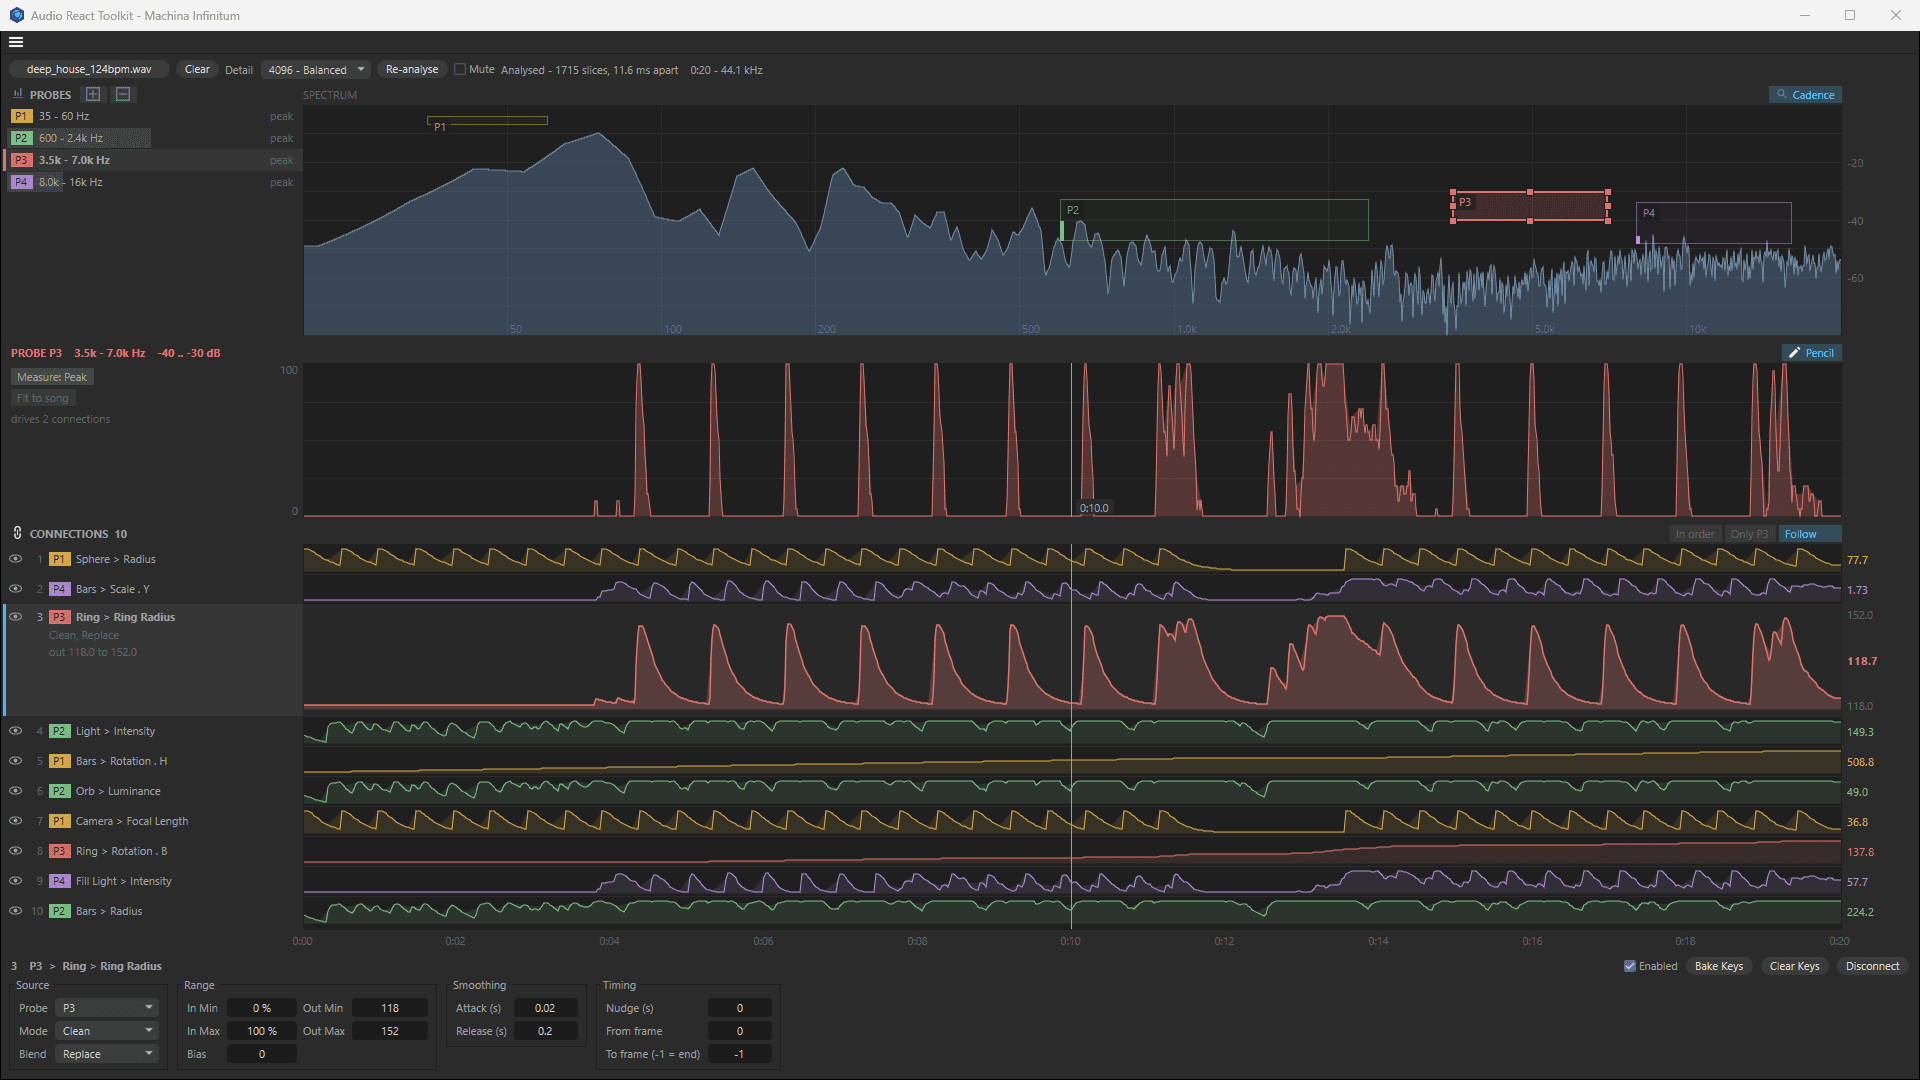
A full Audio React Toolkit project: four probes on the spectrum of a song and ten parameters connected to them, each with its graph

Audio React Toolkit is a Cinema 4D plugin that turns a song into animation. It analyses the audio file itself and shows it as a spectrum you can read, with the kick on the left, the hats on the right and everything else in between.

Any numeric parameter can follow the music: a radius, a rotation, a light's intensity, a deformer's strength, a material's luminance, a camera's focal length. Nothing needs to be keyframed, and anything can be baked to keyframes when you want them.

Workflow

How it works

Three steps, each shown in a short clip. The panel docks anywhere in Cinema 4D.

Dragging a probe onto the kick at the low end of the spectrum, then another one onto the hats

1. Place a probe on a sound

Load your song. Drag the probe's box onto the sound you want, for example the kick at the low end of the spectrum. The graph under the spectrum shows every hit the probe finds in the song. Add more probes for the snare, the hats or the chords.
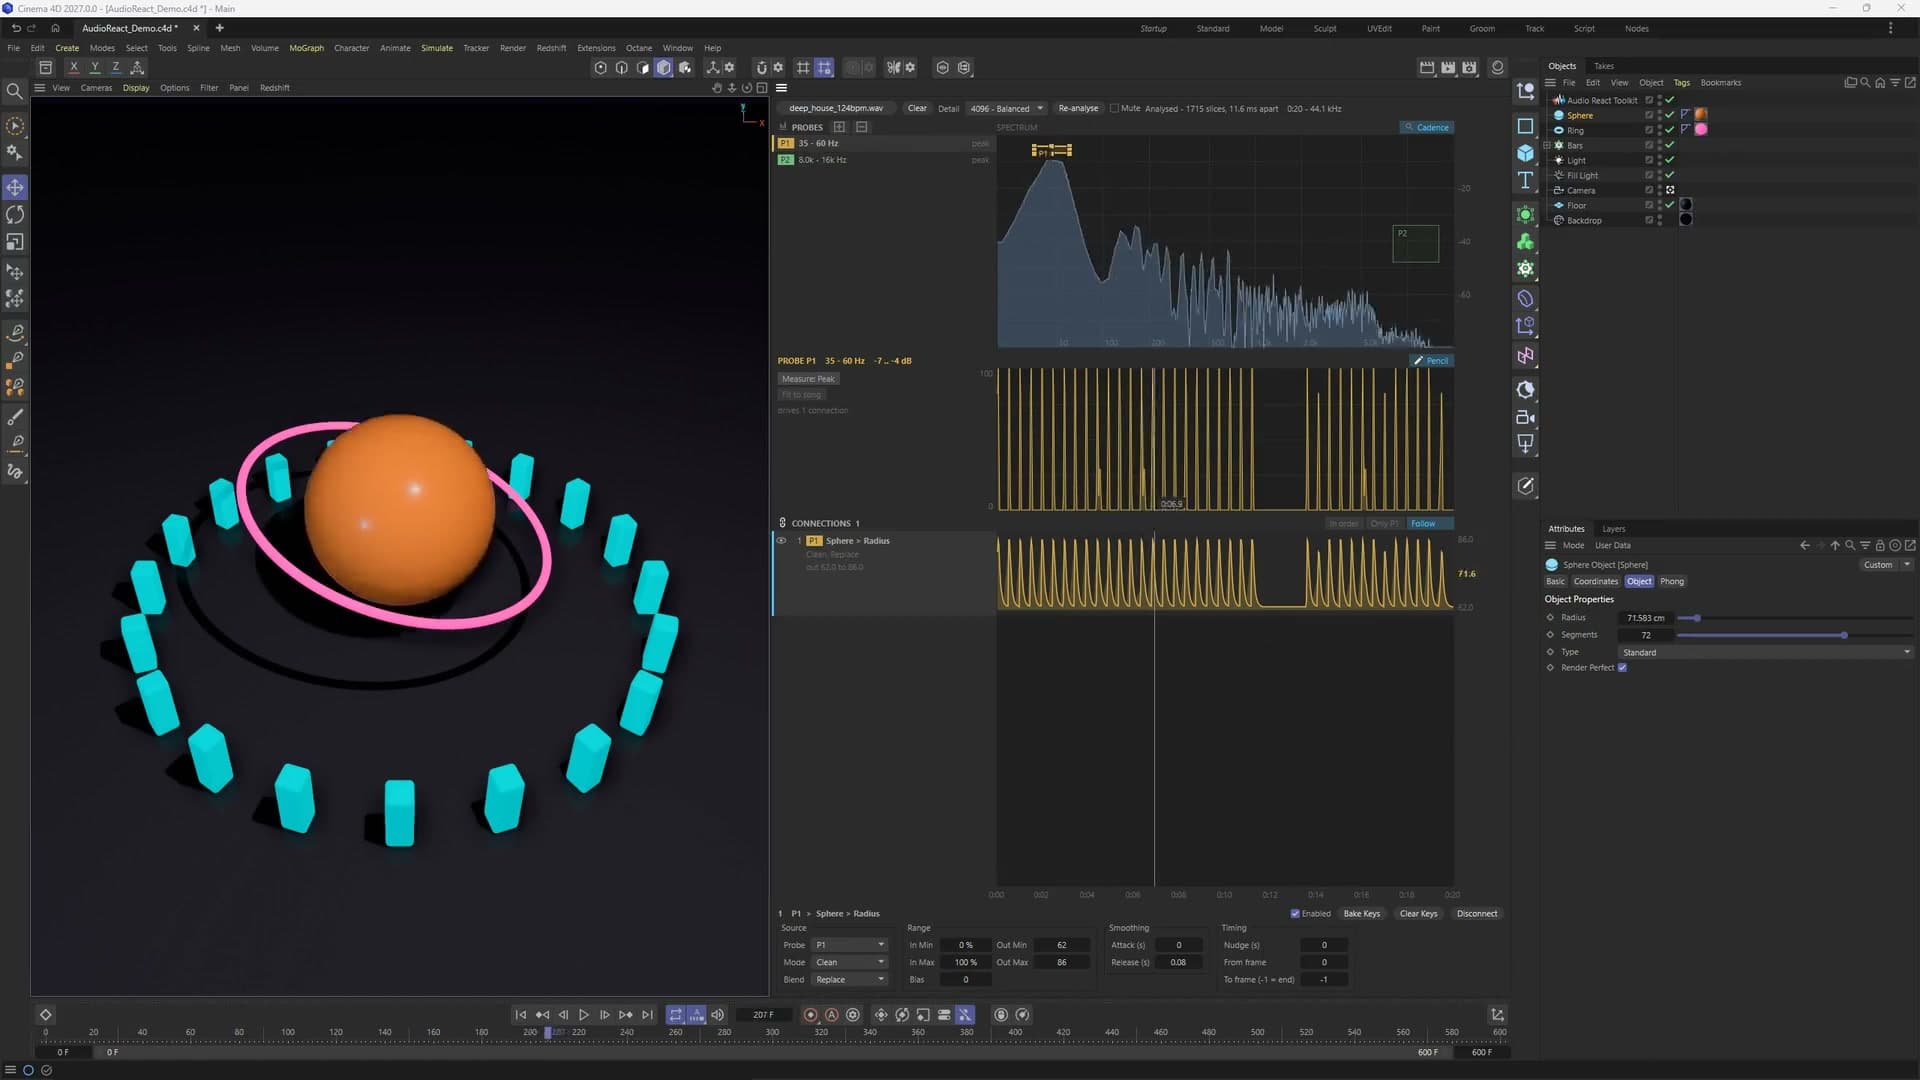
Dragging a sphere's Radius from the Attribute Manager onto the Audio React Toolkit panel, which connects it to the kick

2. Drag a parameter onto the panel

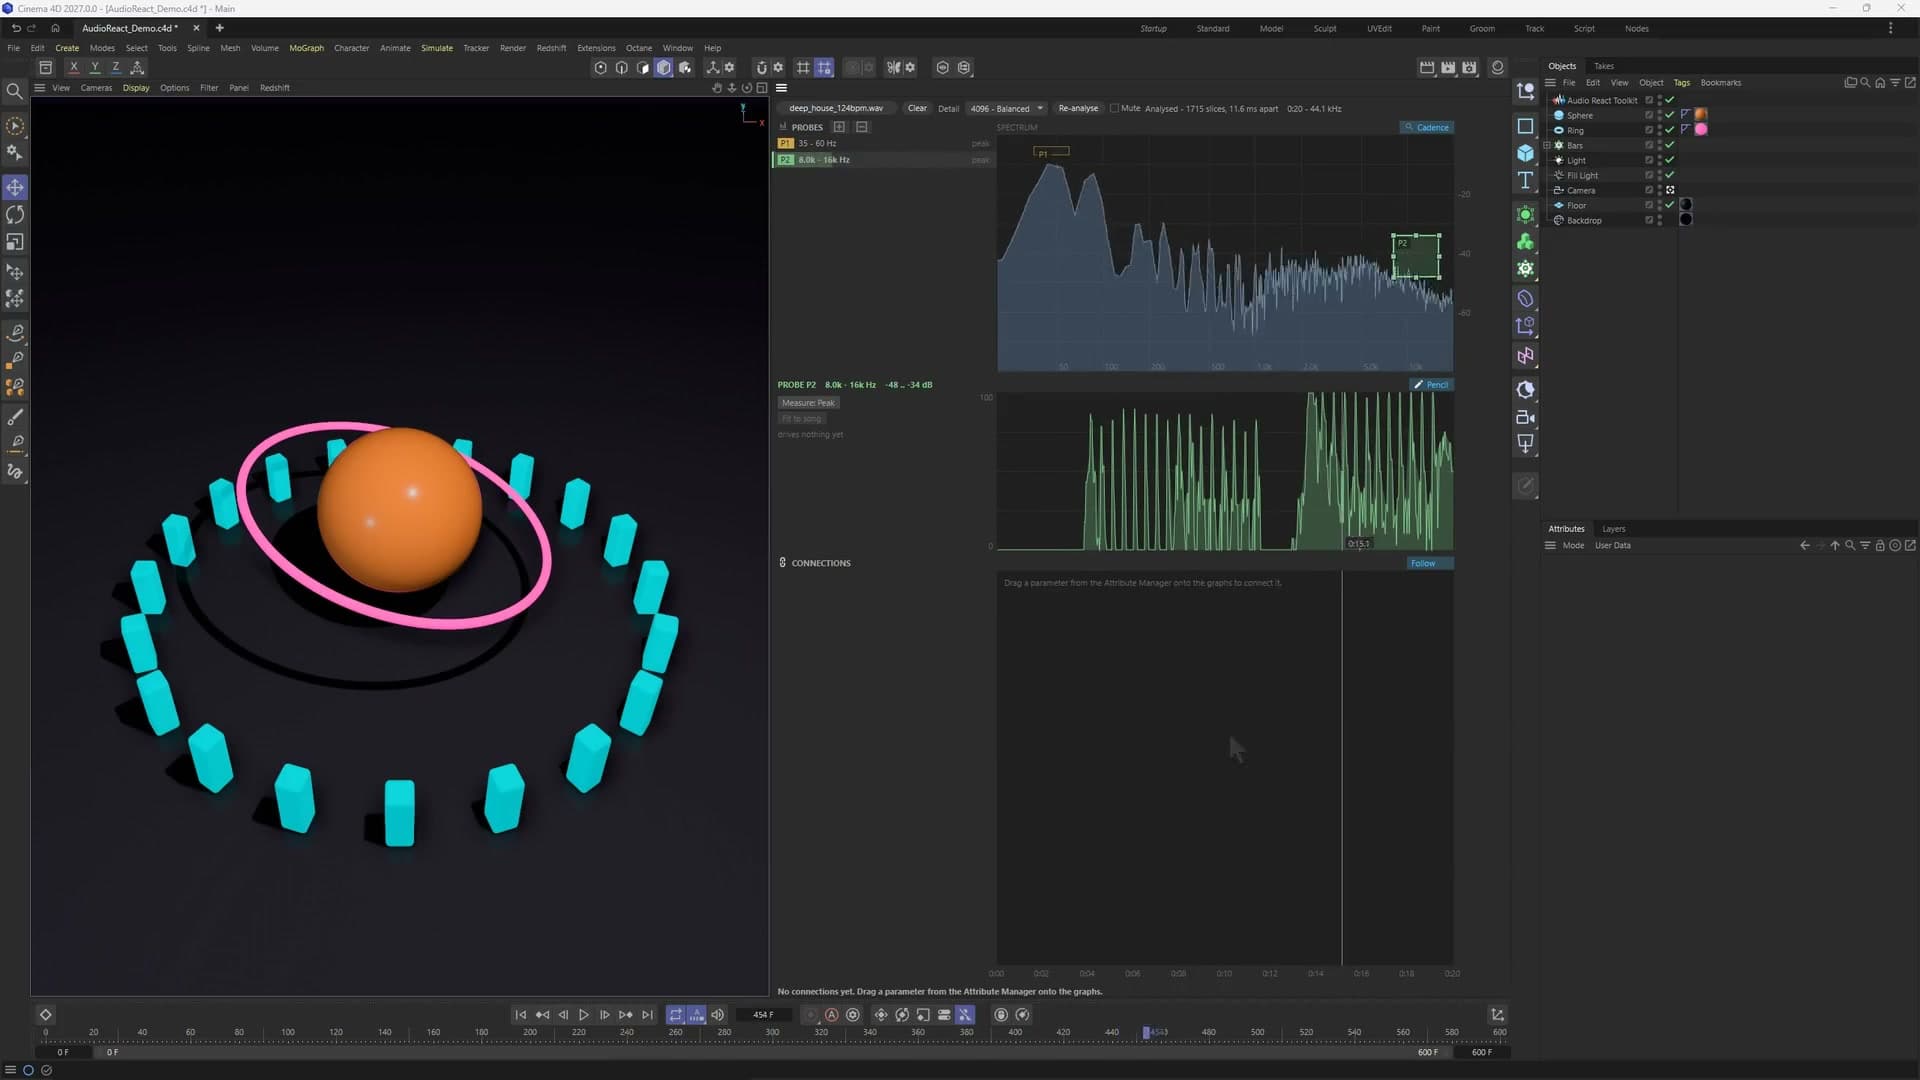
Select an object and drag one of its parameters from the Attribute Manager onto the panel. The connection appears in the list with its own graph, and the parameter starts to move.

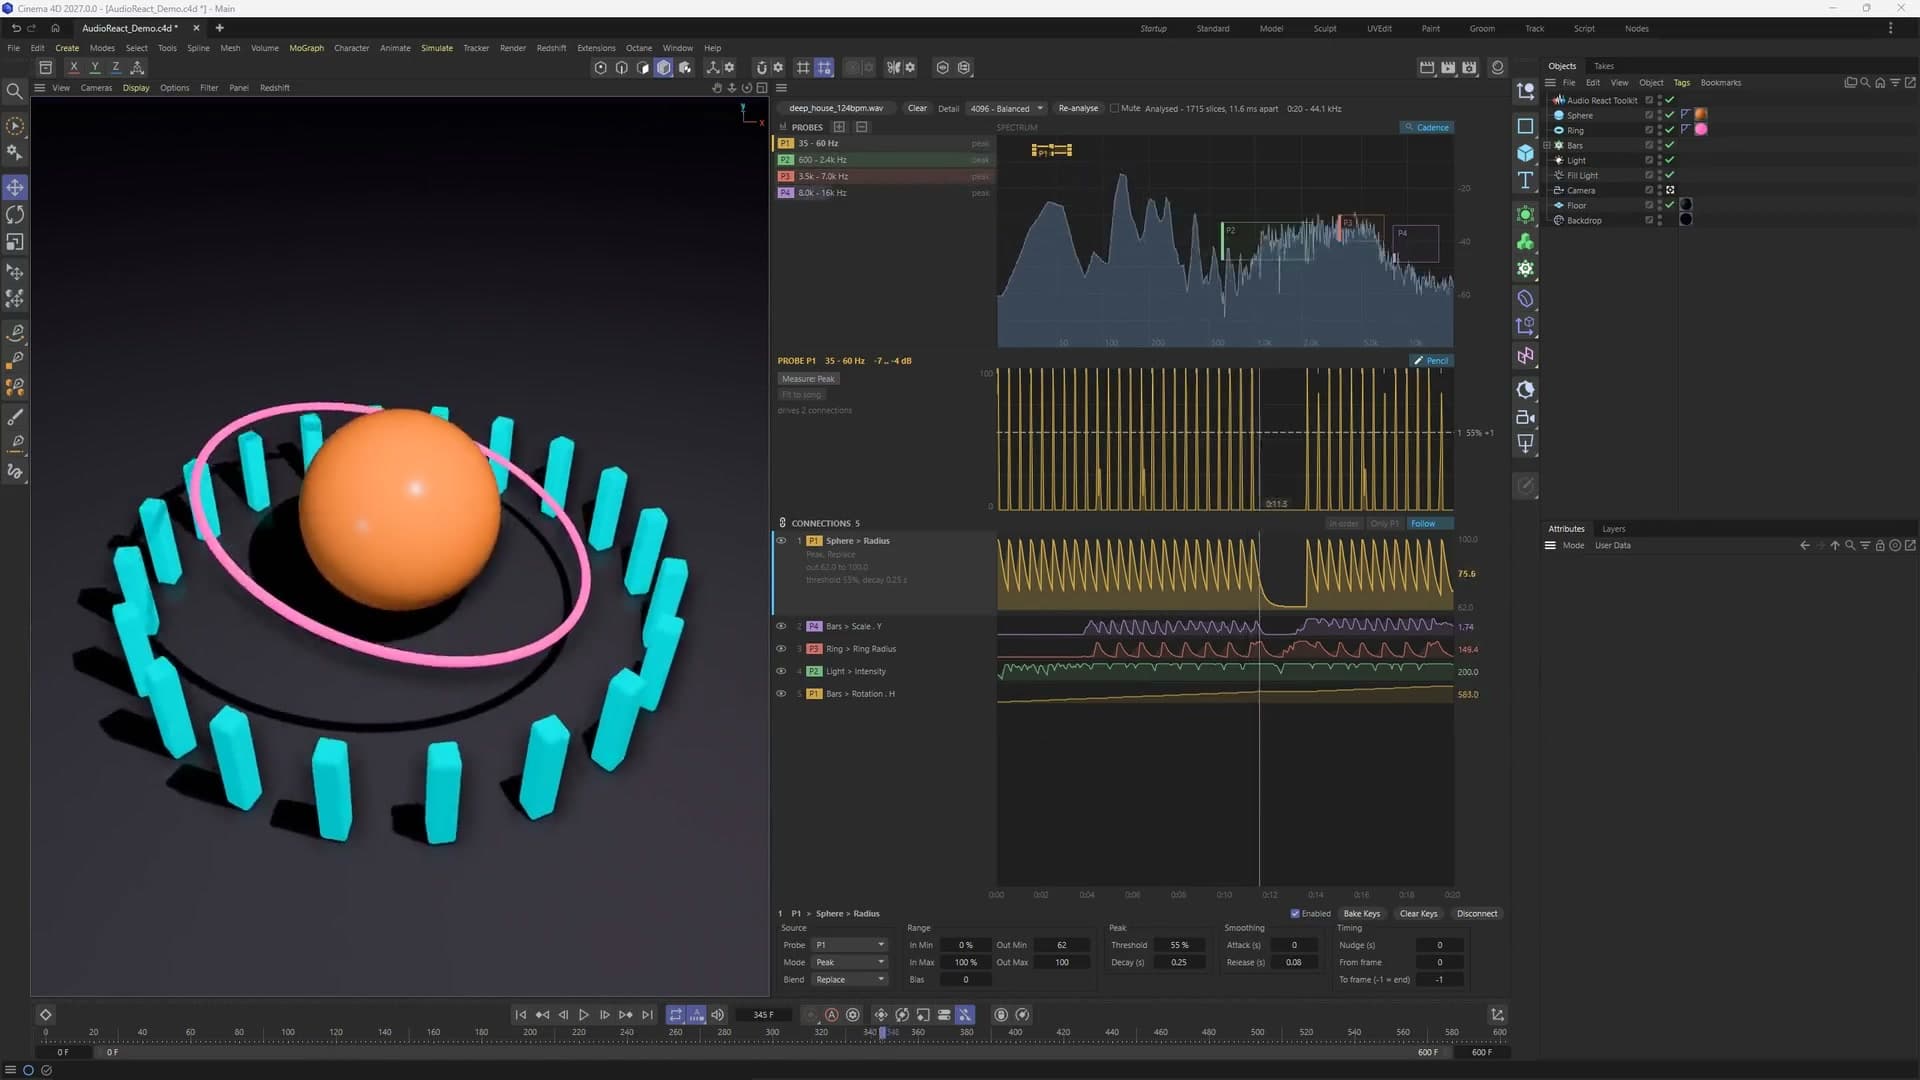
Connecting more parameters one drag at a time: the bars, the sphere, the ring and a light move with the music

3. Map anything

Keep going. Scale, rotation, a light's intensity, a ring's radius: one drag each. Click a connection to open its settings and shape how it reacts.

Probes

The spectrum and the probes

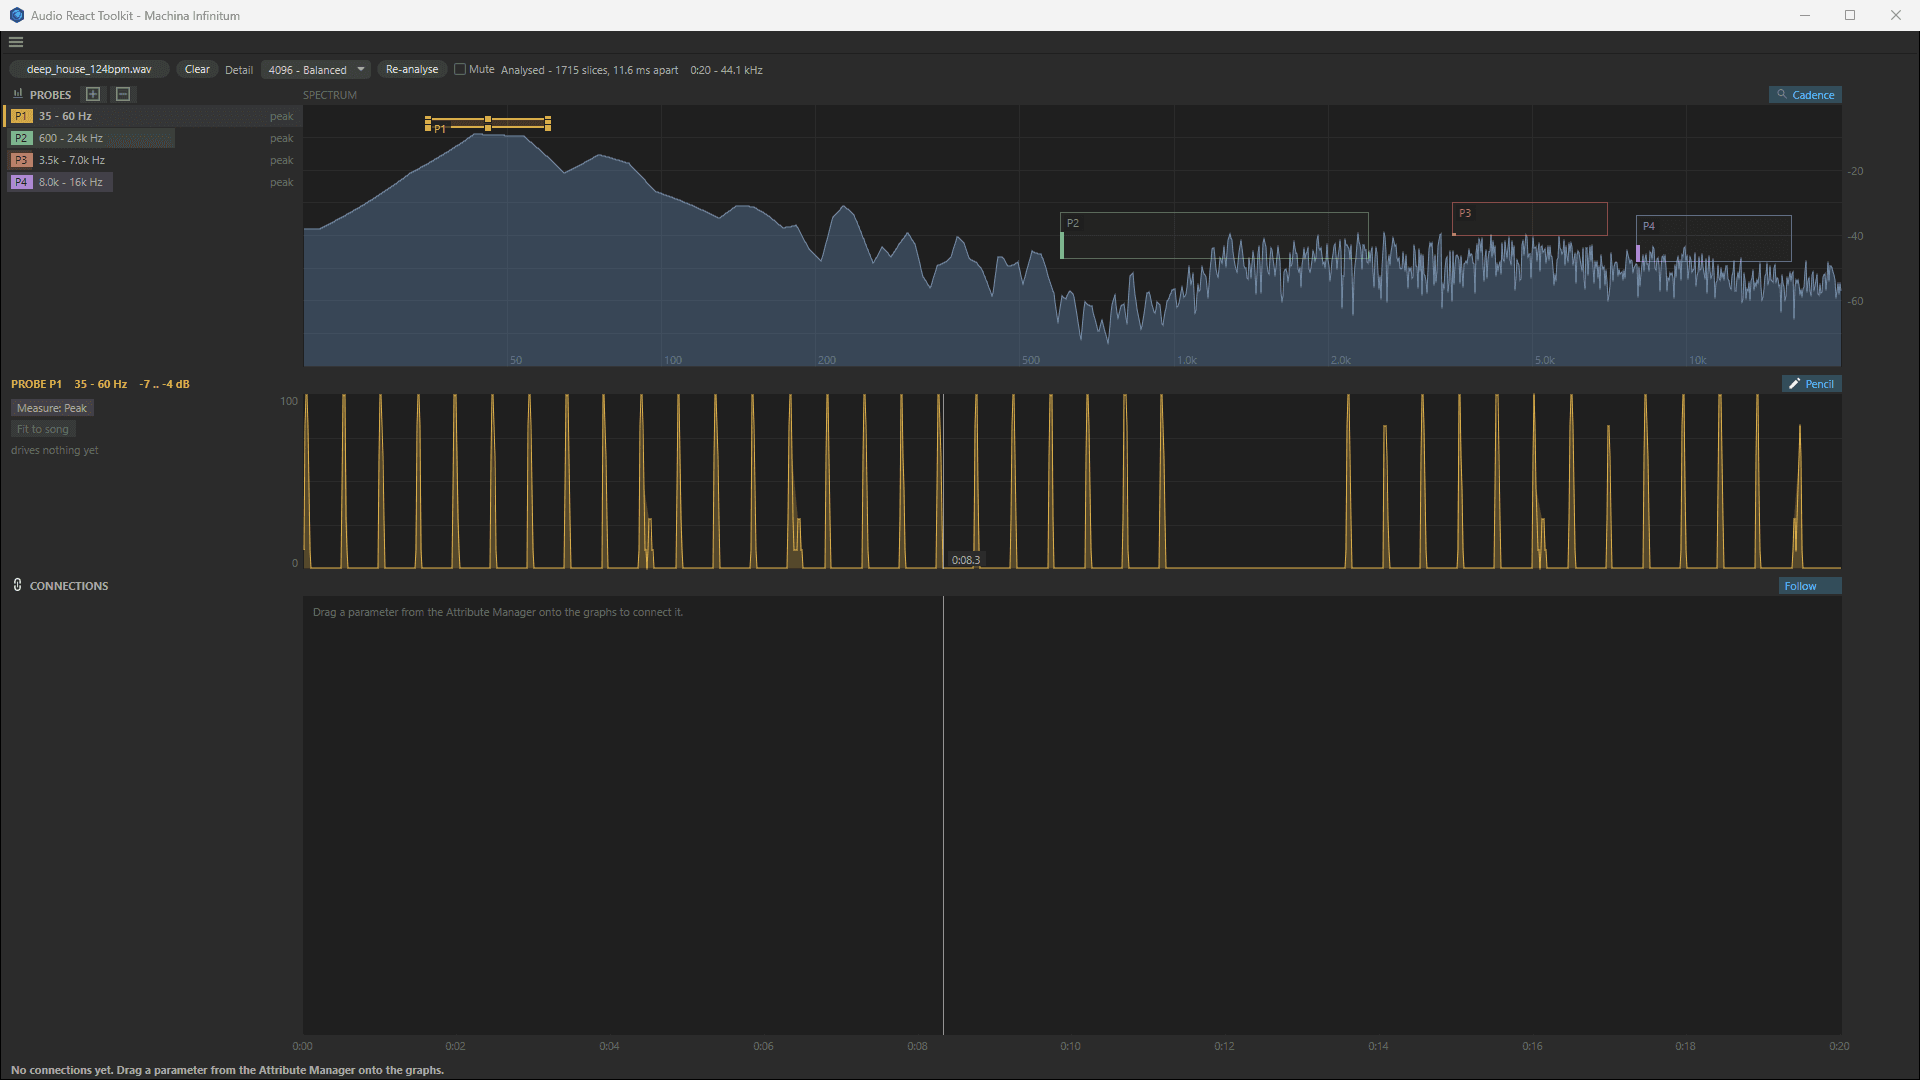
The Audio React Toolkit panel with a deep house song loaded and four probes placed on its spectrum (kick, chords, clap and hats), and the kick probe's graph over the whole song

The plugin has its own audio engine. It loads WAV, MP3 and FLAC files and analyses them directly, with no Sound Effector, no MoGraph setup and no XPresso. The spectrum shows the whole frequency range of the song and moves with the playhead. Play in Timeline puts the song on the timeline so you hear it while you work, and Start Frame moves it.

A probe is a box you drag over a frequency band and a level range. You can place up to eight per song.

  • Each probe measures the Peak, Average or Energy of its band
  • Fit to song scales a probe so the quietest and loudest parts of the song run from 0 to 100
  • Cadence highlights the parts of the spectrum that hit in a steady rhythm, so you know where to put a probe
  • Four levels of analysis detail, from 1024 (fastest) to 8192 (fine)
  • Song analyses are cached, so a song you have used before opens at once
  • Play in Timeline saves the song inside the scene file (turn it off for smaller files)

Connections

Connect parameters by drag and drop

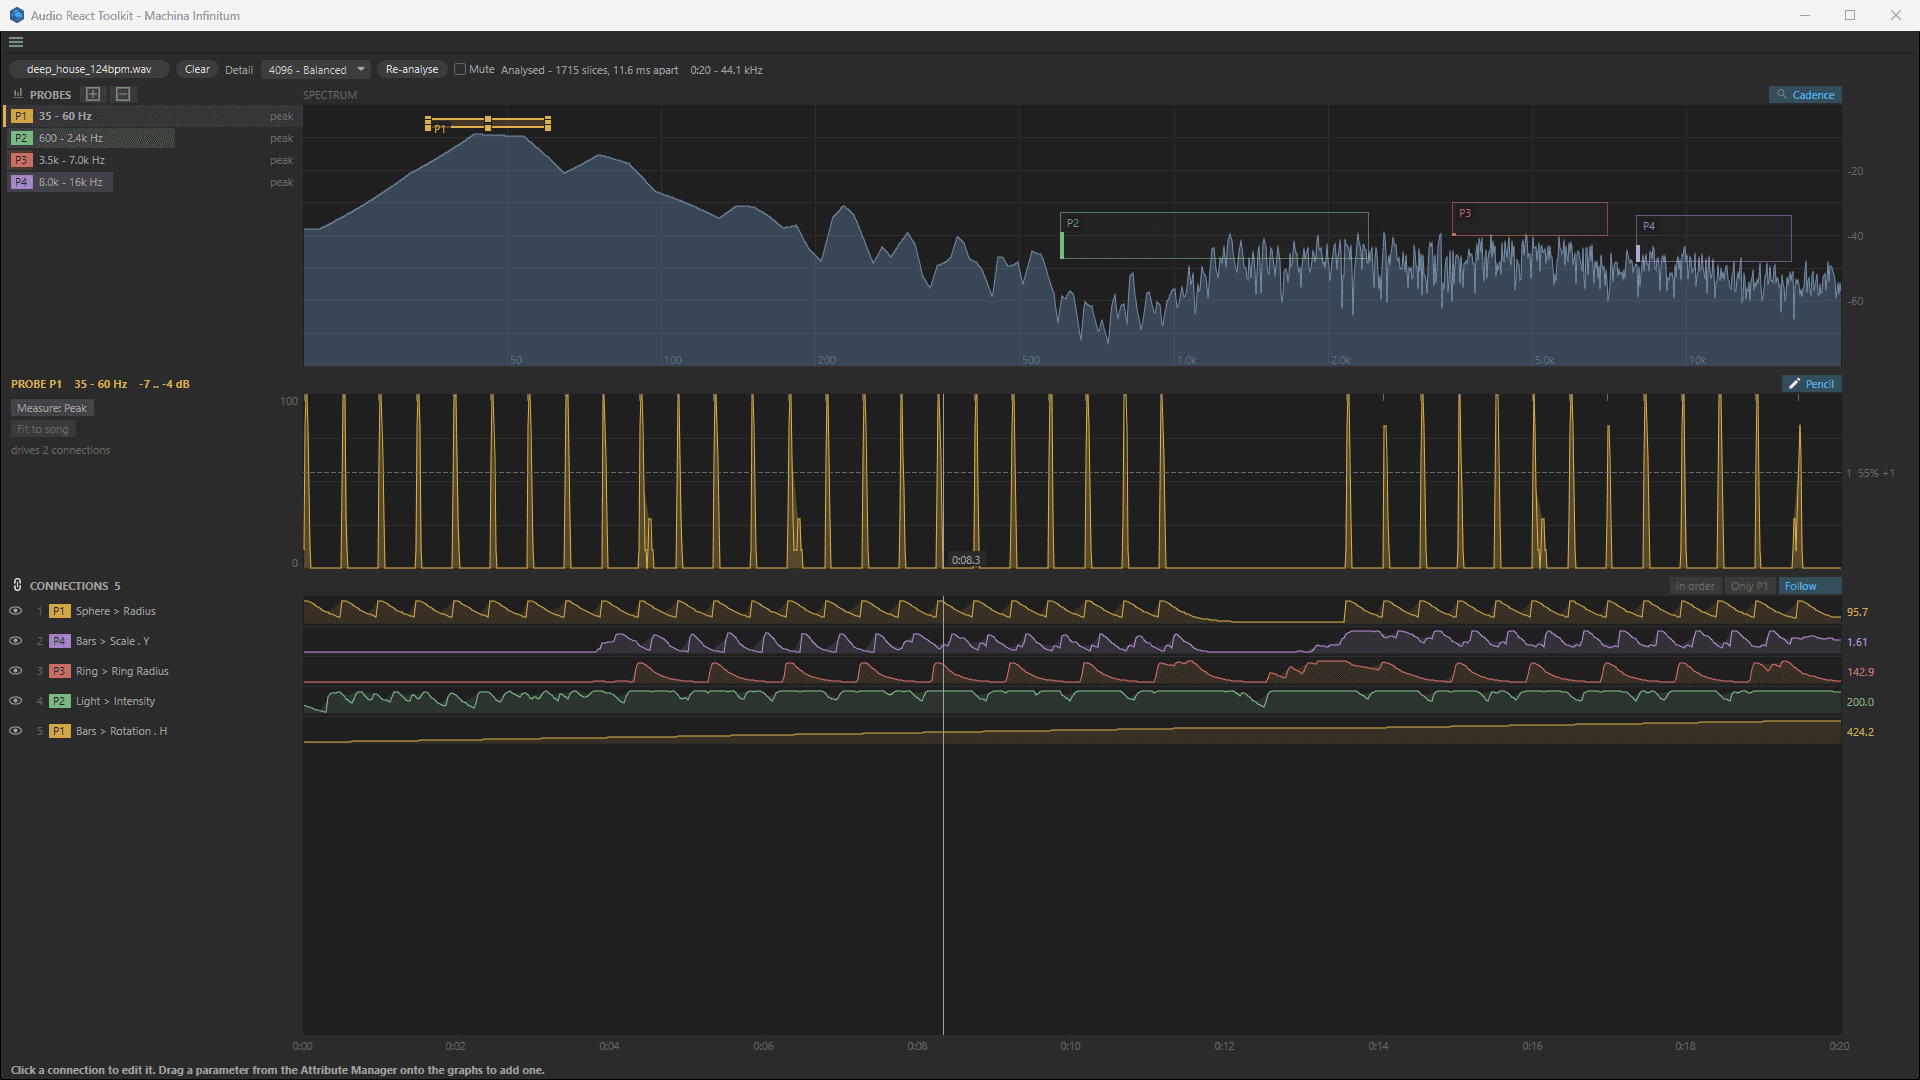
Five parameters connected in the Audio React Toolkit panel, each with its own graph over the song

You can connect number, vector and time parameters on objects, materials, lights, cameras, deformers, cloners and forces. The connections are kept on an Audio React Toolkit object in the scene, up to 32 per object, and one is created for you if the scene has none.

Every connection has its own graph, so you see the value each parameter will have at every moment of the song, next to the others.

  • Blend modes to replace the parameter's value, add to it or multiply it
  • A parameter that already has keyframes keeps them, and the audio is added on top
  • Several connections can drive the same parameter
  • Degrees and percentages are converted for you
  • Bake Keys turns a connection into ordinary keyframes, and Clear Keys removes them
  • Every edit can be undone

Mapping modes

Four mapping modes

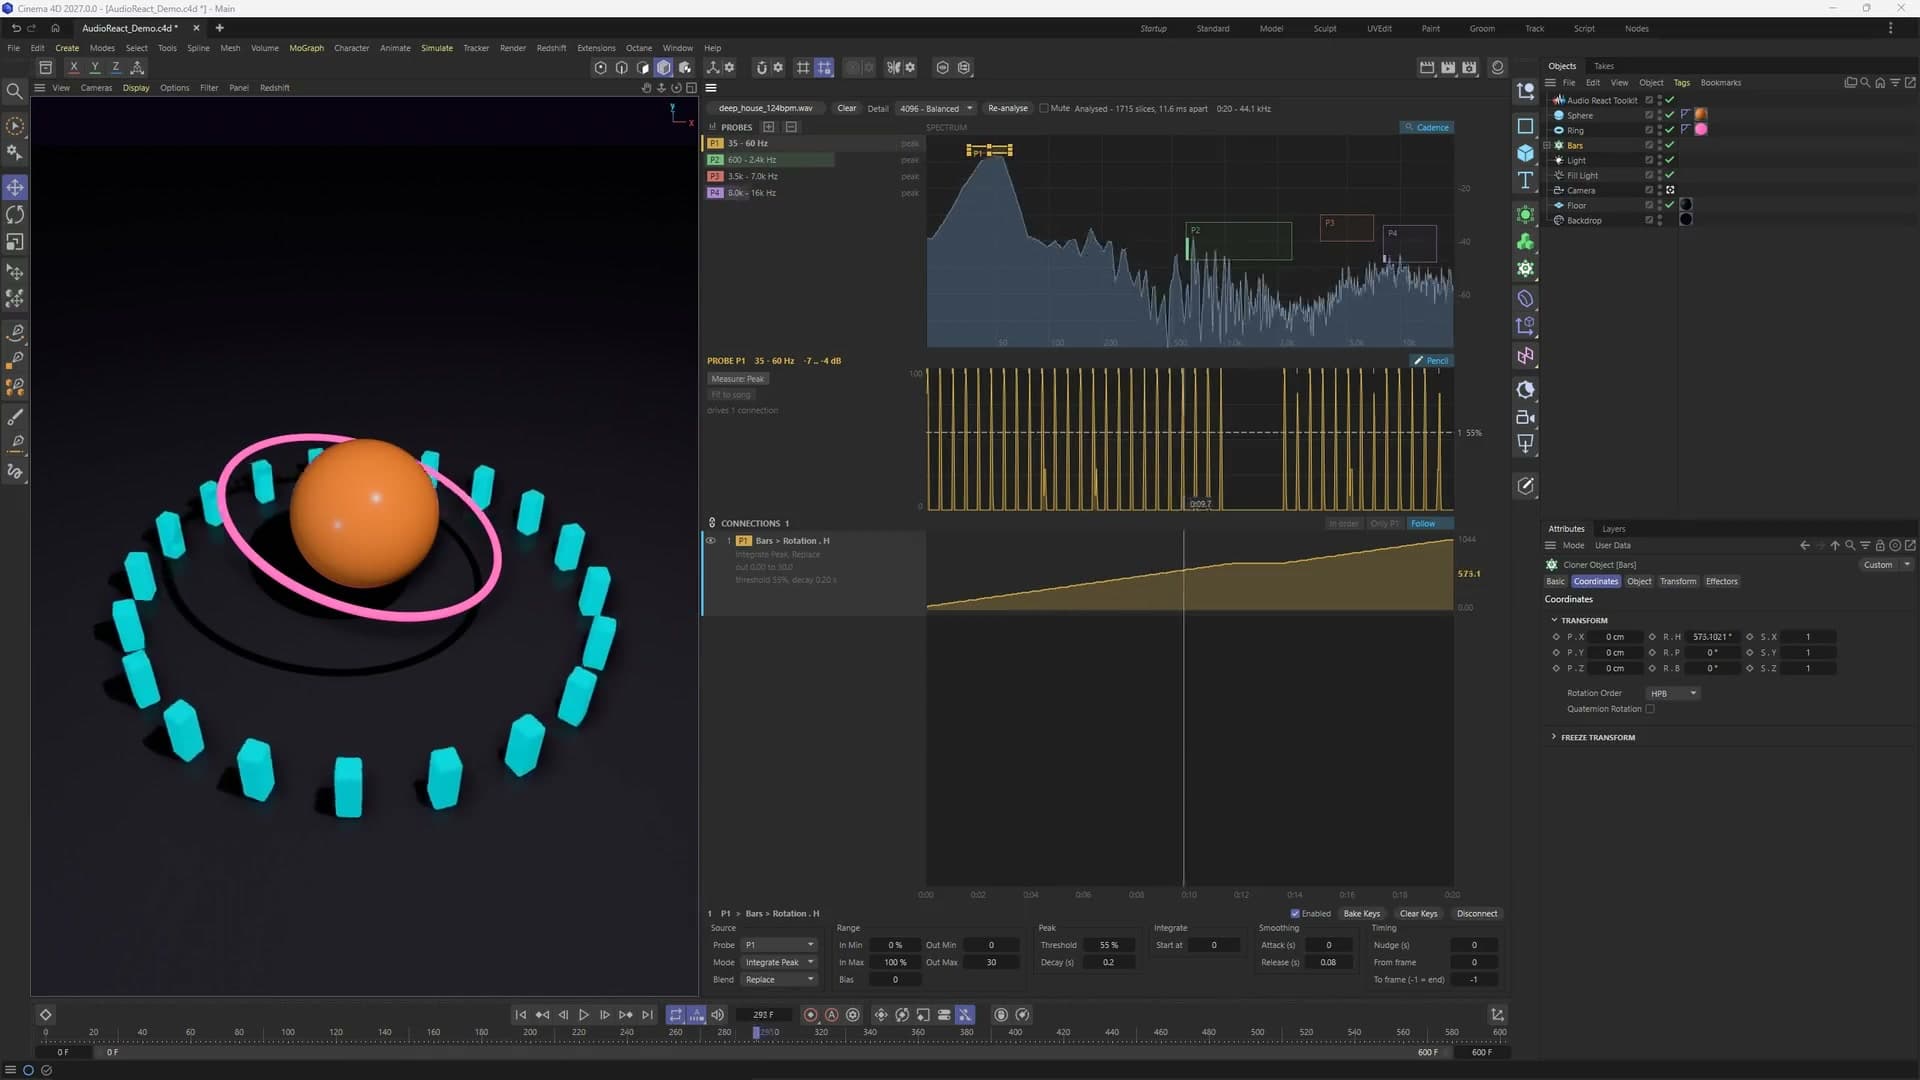
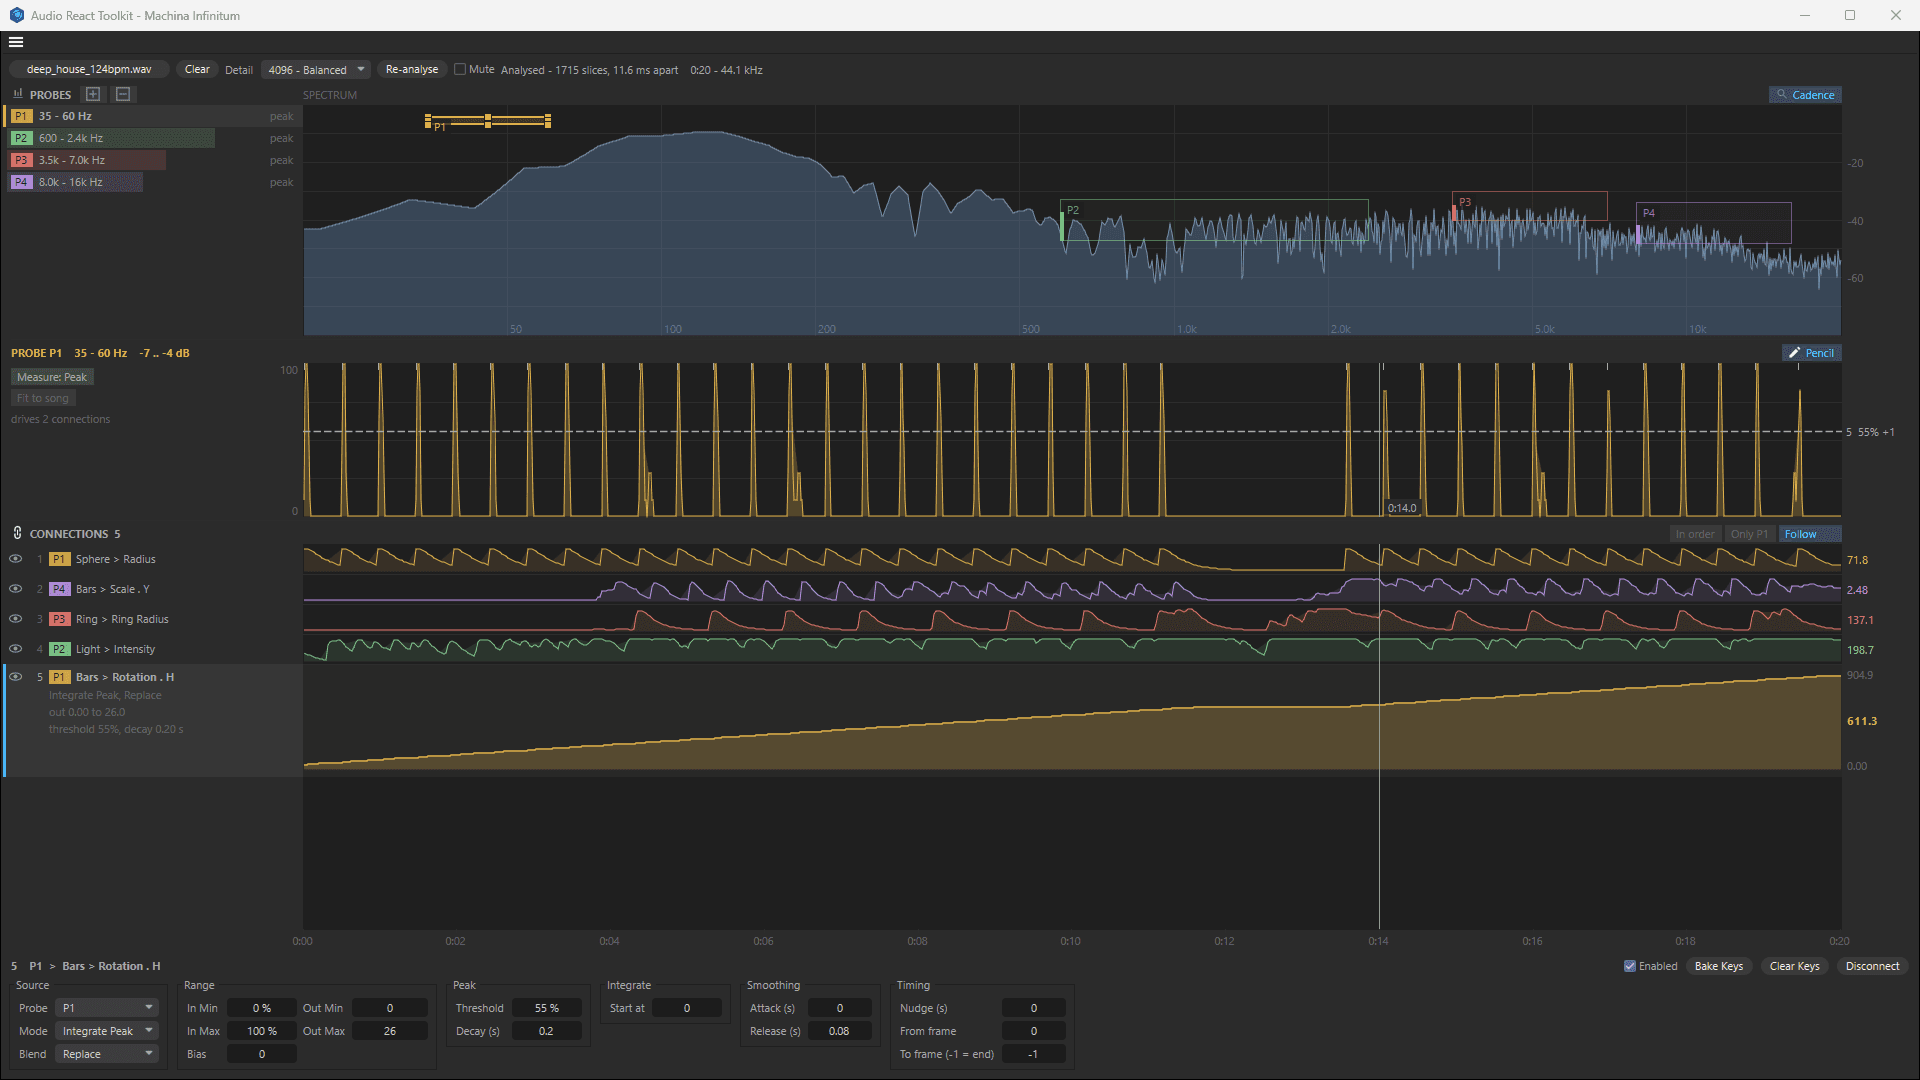
Integrate Peak mode: every kick pushes the rotation of the circle of bars forward

Each connection has a mode that decides how the sound becomes a value.

  • Clean. The value follows the level of the sound. Good for glows, brightness and anything that should breathe with the music.
  • Peak. Every hit above the threshold makes the value jump, then it falls back over the decay time. Good for kicks and snares, for pulses, punches and flashes.
  • Integrate. The level keeps adding up, so the value keeps growing, faster when the sound is louder. Good for rotation and travel that never go back.
  • Integrate Peak. Every hit pushes the value forward and it glides on. Good for turning or advancing one step per beat.
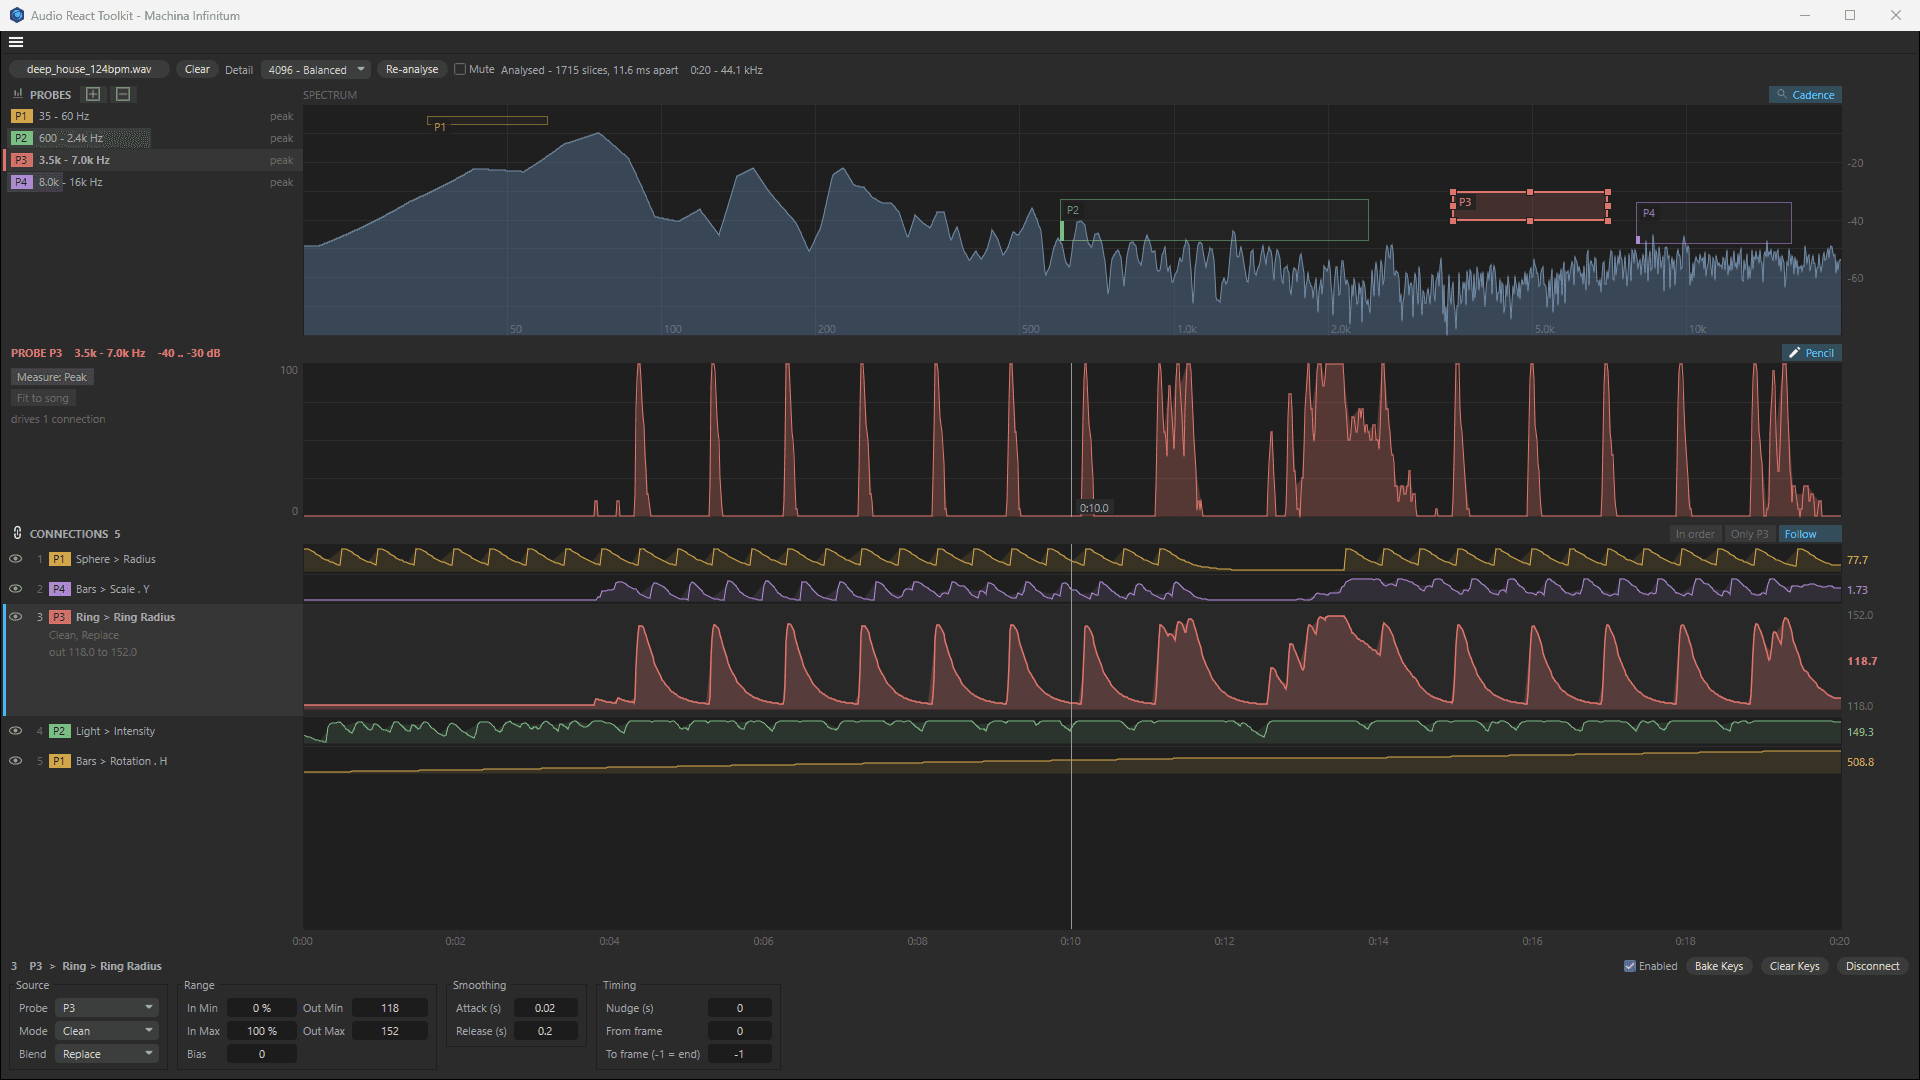
The clap probe's graph and the ring's radius following it in Clean mode

Clean mode

The clap probe drives the ring's radius, which rises and falls with each clap.

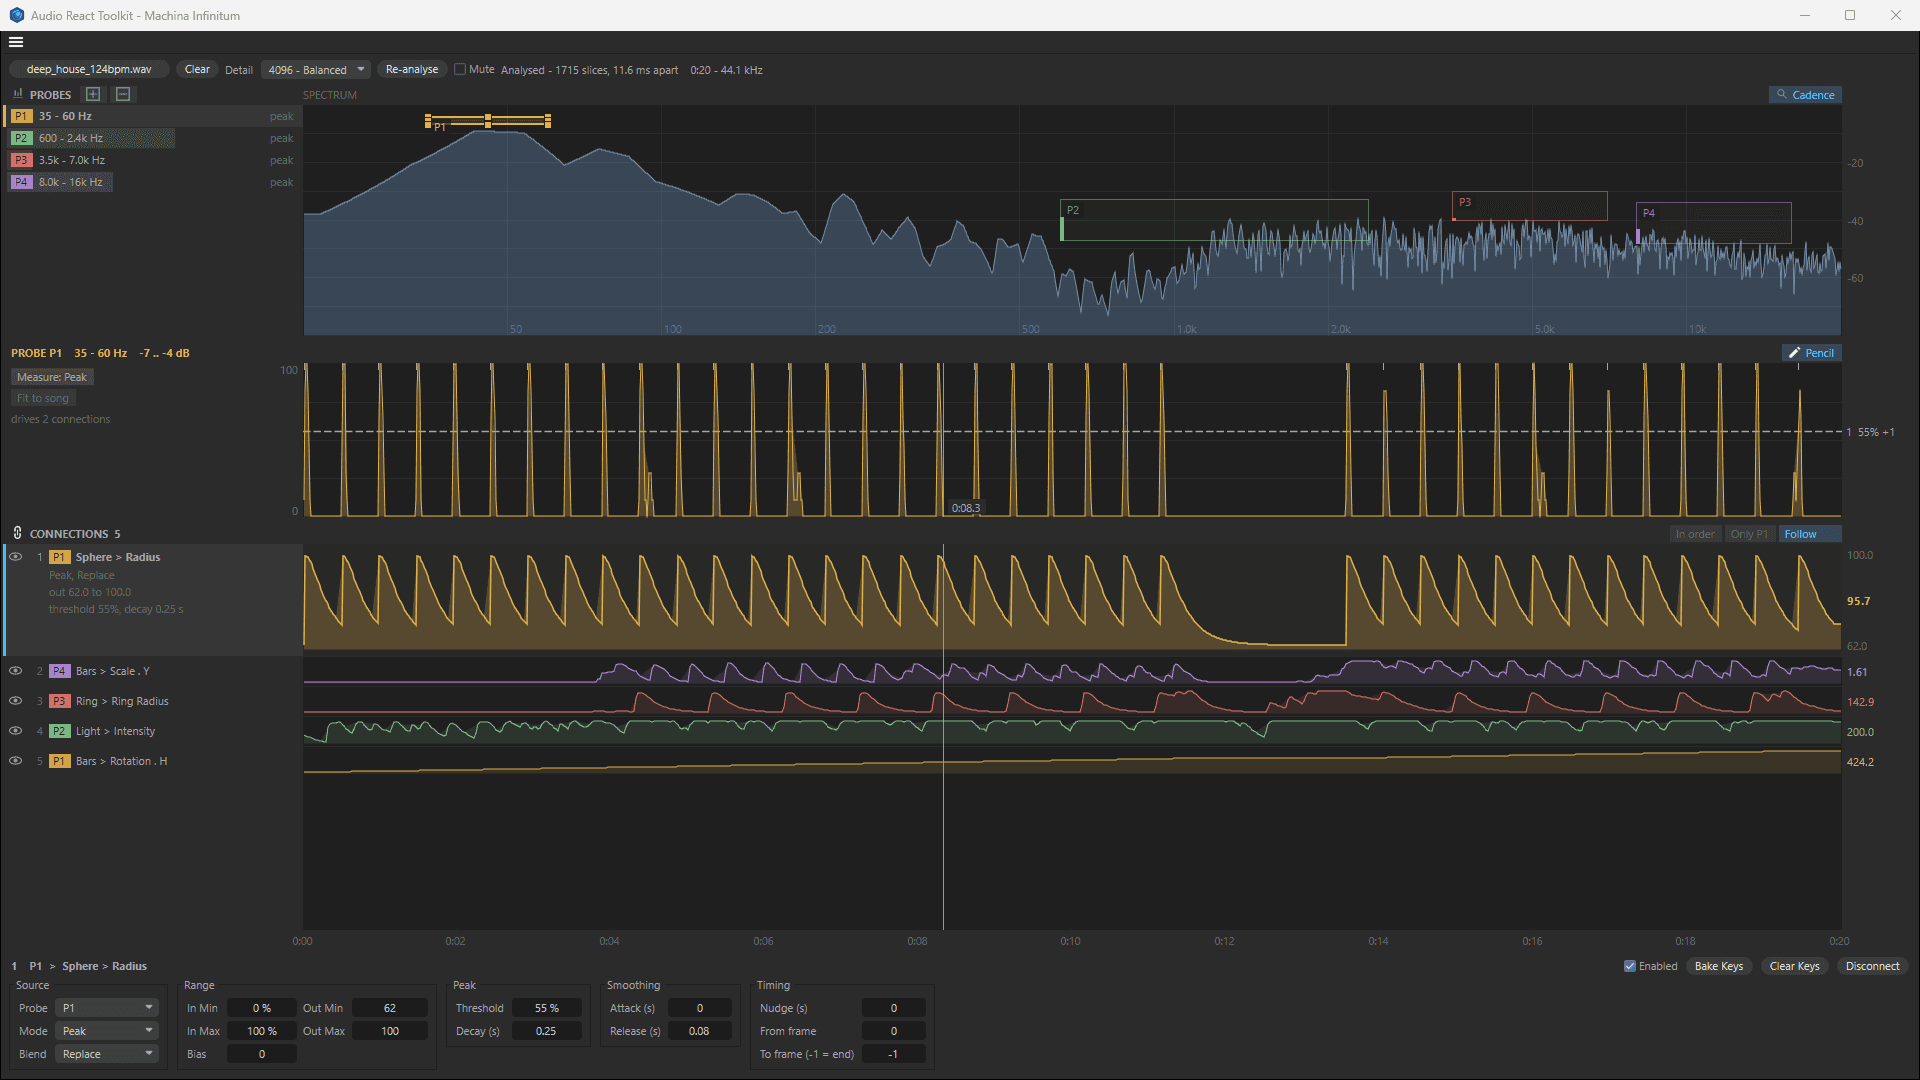
A sphere's radius connected to the kick probe in Peak mode, pulsing on every kick, with its settings under the graphs

Peak mode

The kick probe drives the sphere's radius between 62 and 100. Kicks above the 55 % threshold make it jump, and the smaller hits under the line are skipped.

Settings

Connection settings

The bars' rotation in Integrate Peak mode, climbing with every kick, with all its settings under the graphs: source, range, peak, integrate, smoothing and timing

The settings of a connection open under the graphs. Each connection has its own probe, mode and blend, and some controls appear only in the modes that use them. When you switch a connection off, the parameter gets its own value back.

  • Input and output range, and bias
  • Attack and release smoothing
  • Threshold and decay in the Peak and Integrate Peak modes, with a threshold you can draw over the song with the pencil to catch some hits and skip others
  • A start value, in the Integrate and Integrate Peak modes
  • A time nudge, to move the reaction earlier or later
  • A frame range, to limit where the connection is active

Requirements

Compatibility and installation

Copy the folder for your Cinema 4D version into the Cinema 4D plugins folder and restart Cinema 4D. The panel is under Extensions > Machina Infinitum.

Questions? Write to us.

  • Cinema 4D 2023 (2023.2 and later), 2024 (2024.0 to 2024.5), 2025 (2025.1 and later), 2026 (2026.1 and later) or 2027
  • Windows 10 or 11, 64-bit. There is no macOS version at the moment.
  • WAV, MP3 and FLAC audio files
  • Any renderer, because the plugin animates ordinary Cinema 4D parameters. Renders wait for the song analysis to finish, in the Picture Viewer and in the Render Queue.
  • Version 2.0

Cinema 4D · Plugin

Buy Audio React Toolkit for Cinema 4D

For motion designers who animate Cinema 4D scenes to music and would rather not keyframe every beat by hand.

Machina Infinitum is a studio of developers and artists. We build 3D tools and plugins for Unreal Engine 5, Octane Render, Cinema 4D and Blender, and use them to create music videos, films and VJ loops.

Keep exploring

More for Cinema 4D

All tools for Cinema 4D